You're about to create your best presentation ever

Hot Air Balloon Themed Powerpoint Template

Create your presentation by reusing a template from our community or transition your PowerPoint deck into a visually compelling Prezi presentation.

Hot-Air Balloon

Transcript: The Hot Air-Balloon Invention First hot air balloon was made in 1783 Launched it in December 1783 First passengers in the hot-air balloon was a rooster, sheep, and a duck (animals did survive) The type of hot-air balloon was the Montgolfiére The envelope was made from fabric lined with light colored paper, and a layer of alum coated the envelope to prevent it catching fire. The balloon was tied together by a series of over 2,000 knots Montgolfier brothers French Brothers were two of sixteen Montgolfier children, many of whom worked in the family paper factory in France Made the first successful hot-air balloon Advantages/disadvantages Advantages hot air balloon materials and construction have changed since the 1700's part due to increased interest in helium balloons, which allowed much higher flights. were used in war and sport Ballooning has also gained great popularity in Europe, and in Australia and New Zealand. Disadvantages The popularity of ballooning declined after World War I, in part due to the price of fuel Background history The hot air balloon is the oldest successful human-carrying flight technology. It is in a class of aircraft known as balloon aircraft. The first fight with humans on board took place on October. 15, 1783. On November 2, 1783 was the first free fights with passengers The first military use of a hot air balloon happened during the battle of Fleurus in 1794 where the French used the balloon as an observation post. Facts and Ideas Unmanned hot air balloons are popular in Chinese history. Zhuge Liang of the Shu Han kingdom used lanterns for military signaling. Diseases tuberculosis also known as TB was a disease that would attack the lungs. TB affected those who had been poorly fed and were under nourished. It also affected those who lived in dirty and damp homes. This was an issue because it was easy to spread the disease so lots of people died from it. Advantages and disadvantages The advantages of TB is that they improved the medical technology. The disadvantages of TB was that it killed many people. Background history of TB In 2008, evidence for tuberculosis infection has been discovered in human remains dating from 9,000 years ago, in a settlement in the eastern Mediterranean Signs of the disease have also been found in Egyptian mummies dated between 3000 and 2400 BCE. Facts and Ideas started in the 17th century and lasted for two hundred years, known as the white Plague The high population density as well as the poor sanitary conditions Further Understanding This disease couldn't be avoided because it's spread around easily, also it is one of the oldest diseases around. If I went back in time I would tell the people to not live in dirty and damp houses because you can get TB more quickly. I would tell them to stay away from people who had TB. Also I would tell them to eat healthier. ... small By: Megan Jong The first balloon passengers were a military officer and a physics professor. the professor went on to become a balloonist, although he was killed in a failed attempt to cross the English channel by balloon a few years later, when a smaller hydrogen balloon attached to his hot air contraption caused the entire balloon to burst into flames. Big and....

Hot Air Balloon

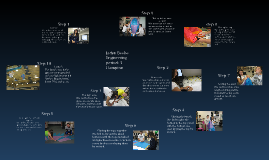
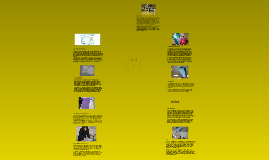
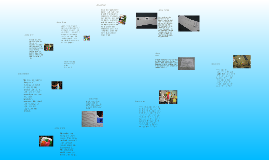
Transcript: Step 1 Step 2 Step 3 Step 4 Step 1: Quiz + Research Paper The first step of the assignment was to take a quiz on the history and mechanics of the Hot Air Balloon with a passing grade. The class was given a sheet of paper with the questions from the Quizstar and it was our job to search the internet for all the answers. Once that was completed, we were allowed to take the Quiz up to three times until a decent grade was achieved. I searched all the answers (finding the majority of them) then took the online quiz. After a couple of times, I got a low B grade, but I took it an extra attempt to at least get an A, considering there may have been some important terms I got incorrect, and I got a 92% as my final score. Step 2: Blueprinting After our Quizstar was completed, we were assigned a partner to cooperate with for the rest of the project. There would be some cases where a partner’s cooperation would be needed to process the build more smoothly, but first they would decide on the color panels the balloon would have as well as the order for the blueprinting on a paper given to them pre-sketched on, rather than graph paper. By the time I was assigned my partner, he was just about done with his own quiz, so I got his opinion on the colors and wrote the labels onto the Balloon Design Worksheet, anticipating how the panels would be put together, how the gores would end up, and in which order. Eventually, we agreed on using blue, green, and purple for our color selections. Step 3: Cutting/Tracing/Gathering the Panels Gathering, tracing, and cutting the panels would require cautious work with the tissue paper. The very beginning of the process was cutting an outline or base panel of both the bottom and top versions, and then gathering our twenty sheets of tissue paper (having 20 panels equal to 10 gores.) Once we had those materials, the task was to trace ten bottom panels, ten tops, and cut them out as neatly as possible without wrinkling or tearing the paper. This step went more smoothly than I thought it would be, even though a few of our panels needed some patching in the end. The only problem was that it took a period longer to cut than necessary, but after coming in during lunch for some extra work time, it turned out well enough. Step 4: Gluing the Panels to create Gores Gluing the bottom panel over the top by an inch was the first of three gluing steps. According to how the blueprints looked, two panels would be combined to create one gore of the color choice. Once ten gores were ready, we had to glue all the bottom gores side-by-side by one inch as well, so that it’d create a flower shape before finishing the envelope. Keeping track of all our panels and making sure we had enough tops and bottoms was a hassle if we didn’t stay organized, but even then I made several mistakes from gluing tops over bottoms, pasting together two of the same panels, and getting the color codes wrong. This step also took quite a bit of time, but the result was relieving. Tranforming into 3D from 2D Transforming a flat, 2D shape into a 3D object that would eventually lift off the ground was the most difficult part of the project. By this step, the bottoms of the gores have been glued and the only thing left to do with the envelope is paste the top panels together. One partner would do the gluing; the other keeping the panels leveled with each other until the last gores were combined, then the balloon shape would form. My partner and I took turns with the glue and keeping the tissue firm, and the first couples were harder than I thought they’d be, but with every gore we got done, it gradually became easier. It was more than a relief to have finished this step successfully and barely on schedule. Attaching the Rim The only thing to do in this step was to cut approximately a two foot long strand of firm paper. This would act as the rim for the bottom of the balloon and to attach it, a few staples would be needed over an inch or so of paper folded over the strand. This also solves any problems with uneven ends, to our benefit. Our rim was a bit longer than two feet, but it worked out fine with the assistance of my partner. I held the tissue paper and rim in place while he stapled the tissue to the stand several times for extra binding. (no picute) Tying the Insulator. This was probably one of the easiest parts of the project, as long as there was a diligent partner to help. All we had to do was cut a string about arm’s length and tie it around the top of our balloon. If done right, the hot air should be trapped inside the envelope, instead of escaping through the top. The hot air, when locked, would rise with the balloon, but if done incorrectly, there wouldn’t be chance that the balloon would ever lift off the ground. This step only took a few minutes and, thankfully, I had a good partner. He held the ends of the balloons while I tied the string around an extra couple of times just to assure the tightness. We cut the supplemental

Hot Air Balloon

Transcript: Step one! We did research and took our Quiz Star exams! I got 21/25. We had to research ideas on how to build a good design. Step two! We made blueprints for our HAB. We chose the colors for our panels. Mine and Bridger's was supposed to be a rainbow, but it was kind of just a bunch of random colors :) Step three! We traced out the pattern for our panels. Once we had that traced and cut out we cut the gore into the top and bottom panels so we could use it to trace the panels for our envelope. We had to make sure we cut it out straight so they'd line up when we glued them Step four! Once we had every panel cut out, we glued the panels together to make our gores. We had to make 10 gores and 20 panels. We to make sure that we glued them together an inch inwards, and not very much more than that. Step five! After every panel was glued together to make a gore, we glued all 10 gores together to make our envelope. We had to make sure we didn't tear the tissue paper. Step six! We had to glue the two ends of the gores together to make the envelope. It was tough getting it perfectly enough that it didn't have too many wrickles and that it didn't rip. Step seven! We cut an arm's length of string to make a tie so we could tie it at the top of our envelope so the hot air wouldn't escape. We tied the string to the top as tight as we could. Step eight! We made the ring in this step. The ring helped support the tissue paper when we launched it. We used dry wall tape to make the ring. Step nine! This step was when we tested our balloon. We tested it to make sure that there wasn't any holes in our envelope. To test it I held the balloon on the launch pad and Bridger went around marking the holes with a marker. We had 4-5 in ours. Step ten! This was the launch!!:) We got 100%! But ours went kind of lop sided because the left side was a tad heavier than the right, but we still aced it! :) Yay! Phaeren Roby Engineering HAB Period 3

Now you can make any subject more engaging and memorable