Presentation template
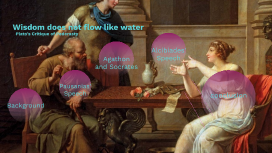
Transcript: Wisdom does not flow like water Plato’s Critique of Pederasty Pederasty Background Symposium Pederasty My Project Pausanias' Speech Pausanias' Speech Two Aphrodites Uranian Heavenly Pandemos Common Text Text Pictures Pictures "Here, Socrates, lie down alongside me, so that by my touching you, I too may enjoy the piece of wisdom that just occurred to you while you were in the porch. It is plain that you found it and have it, for otherwise you would not have come away beforehand." Agathon and Socrates “It would be a good thing, Agathon, if wisdom were the sort of thing that flows from the fuller of us into the emptier, just by our touching one another, as the water in wine cups flows through a wool thread from the fuller to the emptier. For if wisdom too is like that, then I set a high price on my being placed alongside you, for I believe I shall be filled from you with much fair wisdom. My own may turn out to be a sorry sort of wisdom, or disputable like a dream; but your own is brilliant and capable of much development, since it has flashed out so intensely from you while you are young; and yesterday it became conspicuous among more than thirty thousand Greek witnesses." "You are outrageous, Socrates," Agathon said. "A little later you and I will go to court about our wisdom, with Dionysus as judge, but now first attend to dinner." how water flows Principle at play When they do engage in a contest about love Timeline YEAR Alcibiades' Speech Socrates, he claims, is like “those silenuses that sit in the shops of herm sculptors, the ones that craftsman make holding reed pipes or flutes; and if they are split in two and opened up they show they have images of gods within.” (215b) Alcibiades' Speech You, in my opinion,' I said, 'have proved to be the only deserving lover of mine; and it seems to me that you hesitate to mention it to me. Now I am in this state: I believe it is very foolish not to gratify you in this or anything else of mine—my wealth or my friends—that you need; for nothing is more important to d me than that I become the best possible; and I believe that, as far as I am concerned, there is no one more competent than you to be a fellow helper to me in this. So I should be far more ashamed before men of good sense for not gratifying a man like you than I should be before the many and senseless for gratifying you.' Seduction Scene 'Really, my dear Alcibiades, you're no sucker if what you say about me is really true and there is some power in me e through which you could become better. You must see, you know, an impossible beauty in me, a beauty very different from the fairness of form in yourself. So if, in observing my beauty, you are trying to get a share in it and to exchange beauty for beauty, you are intending to get far the better deal. For you are trying to acquire the truth of beautiful things in exchange for the seeming and opinion of beautiful things; and you really have in mind to exchange "gold for bronze." But blessed one do consider better: Without your being aware of it—I may be nothing. Thought, you know, begins to have keen eyesight when the sight of the eyes starts to decline from its peak; and you are still far from that.' Conclusion conclusion If Socrates were to have sex with Alcibiades, he would perpetuate: 1) the idea that people can make each other wise. impact: prevent Alcibiades from realizing his ignorance about wisdom 2) Alcibiades belief that his physical attractiveness is the most important thing about him impact: the belief could harm Alcibiades as he begins to decline from his physical peak, when “Thought begins to have keen eyesight.” (219a) 3) Socrates would be no better than the sophists who cannot acknowledge the ways in which they are ignorant, and thus, risk self-deception. Advantages Advantages to my account: -Fits with the well-known picture of a Socrates who: 1) proclaims his own ignorance. 2) critiques the Sophists for i. both not acknowledging what they do not know ii. exchanging money for wisdom -Makes explicit the way Plato critiques the customs of his time -Throws into question a vision of Socrates as someone who consistently denies bodily urges -Makes clear that the container model is supposed to function in opposition to the image of pregnancy and birth. Accounts of “Plato’s Appropriation of Reproduction” run these two images together.